ACNH Guides by Katu
Here are the guides which I have written for ACNH. You may also find them in other places, such as on Reddit or Twitter, but I thought it’d be nice to have them all in one place.
Contact
I’m all over the place. I spend most of my time on Twitter, where I primarily share ACNH custom patterns or screenshots. My Instagram is only partly ACNH and I don’t spend much time there. If you’d like to support me, I do have a ko-fi and other ways to donate.I also have a bunch of free Lightroom presets on my ko-fi!
Meteonook Tips
Meteonook is a website which allows you to predict your island’s weather.Most of the information you’ll need is here at the website. There’s also a beginner guide by Yue here! This guide is more of a series of tips for using the tool effectively and saving time while doing so.Finding your Meteonook seed is a fairly easy, if time-consuming, process. Here's what I've learned from my experience finding the correct seed for two separate islands. In both cases, it took me only a week or so worth of data.First, let’s get the vocabulary out of the way:
Seed
This is the number which represents your island’s weather patterns from now until the end of time. Every cloud, every shooting star, every double rainbow - these are all predetermined, and contained in your island’s seed. In meteonook, it’s represented by a multi-digit number.
Data
The information you gather by observing your island’s weather. If it’s raining at 5pm and at 8pm it’s clear with shooting stars - that’s data. That’s what you’ll be entering into the meteonook tool to determine your seed.
Weather Type
The weather type is the weather events that can occur on your island, such as sunshine, rain, snow, etc. Meteonook will call them “Sunny” or “Cloudy” or “Heavy Snow.” You will have multiple weather types across the course of a given day.
Weather Pattern
The weather pattern is a collection of weather types. Meteonook will call these “Fine02” or “Clear01.” You will only have one weather pattern per day.
Special Cloud
Somewhat recently added, each season adds special cloud events that can occur under certain circumstances. These can help in finding your seed. More information can be found in the Meteonook documentation.
JSON
A language in which data can be easily written and read by a machine. In this case, Meteonook offers you the option to export your data to JSON. This way, if anything happens to your computer or browser cache, you can easily import all the information you’ve entered, without having to enter it manually.
Now, onto the tips:
1) Bad data is worse than no data.
One more time: Bad data is worse than no data! Omitting something you're not positive about may mean you need to collect a bit more data to find your seed. Adding something you're not positive about - if it turns out to be incorrect in any way - will stop your progress entirely until it's removed. Imagine you're playing hangman.
You can probably decipher H _ N D B _ G as "handbag." But what about H _ N D B I G? This is sorta like that, except the hangman is a million letters long and the player is a computer. The computer is trusting your data completely. Do not mislead it.
2) Become a Time Lord
The easiest (and not to mention fastest) way to find your seed is time travel. No big surprise here. You can gather all your data at once, from the most helpful times of day, and everything is fresh in your mind - in case you made a mistake, it's easier to remember which bit of data could be incorrect. If you're doing things in real time, I recommend entering your data daily and I don't recommend using random screenshots - it's best if you treat this as a deliberate project. More casual data collection will take significantly longer in most cases.
3) Lock in each day’s data
Enter data from multiple hours in a day. For every day you enter data, it's best if you can record enough to lock in that day's weather pattern. Once you do this, the website will say “You have enough now!” This can take a fair amount of recording, but it is definitely a shortcut to finding your seed. This next tip should help cut down on this task.
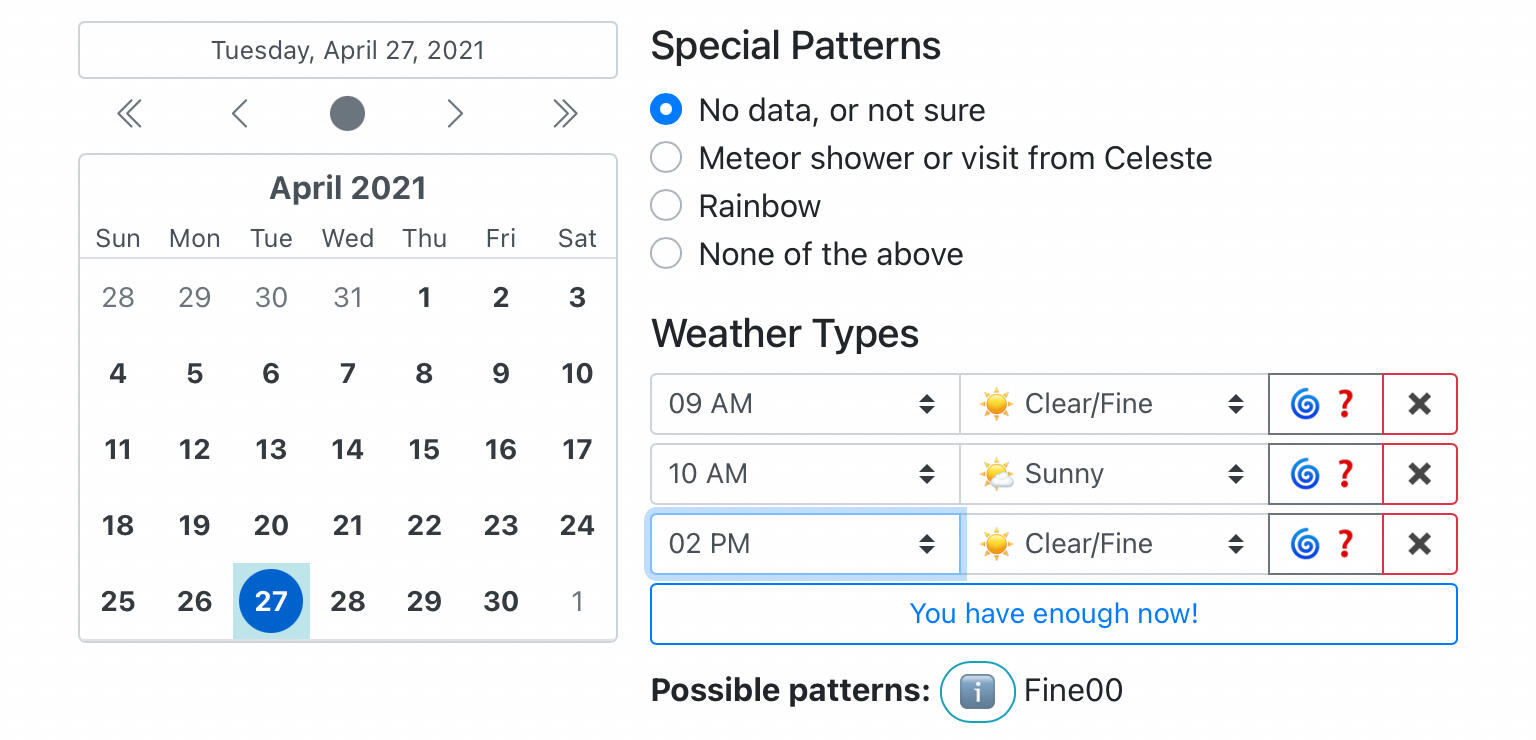
4) Compare possible patterns
Cross-referencing different weather patterns is a time investment which can pay off in a TON of time saved. This consists of taking the potential patterns that Meteonook gives you, and comparing them to find when the differences occur.Let's say at 9am you have Clear weather. You get a possibility of Fine00 or Fine01 or Fine02 weather patterns. You compare them and find that they all have 10am as Cloudy, but that at 11am, Fine02 has Rain/Snow, where Fine00 and Fine01 both still have Cloudy.You now know you can skip the 10am recording, because it can't eliminate any of the weather patterns. You can do 11am, and if it's Rain/Snow, you now have your weather pattern for that day locked in, and won't need to record until the next day. If it's Cloudy, you know you've eliminated Fine02, and can compare the remaining 2 patterns to see where they diverge again, and record that hour to determine the pattern for that day.
5) Time your shooting stars
However, even if you've locked in your pattern for that day, it's a good idea to record the minutes in which shooting stars occur. I am strongly of the opinion that you should NOT record stars down to the second - they don't always appear visually right away, and if you get even one wrong, it can invalidate your whole data set and prevent you finding your seed. Recording which MINUTE a star appears in is both easier and safer. Personally, I only recorded a couple of stars on any given night, because I was wary of how setting the gaps worked. Remember: no data is infinitely better than bad data!
6) Check your data every day
At the end of each day of recording, hit the button to search for your seed. The bar might take a while to reach 100%, but be patient, it's literally searching millions of possible seeds. At the end, it will tell you whether you have too many matches (need more data), a few different matches (almost there!), or no possible matches (bad data). If you have bad data, now you know you only have to nitpick one day of recording. Much better than having to go through your whole history.
7) BACK UP YOUR DATA!
No data might be better than bad data, but existing (correct) data is WAY better than missing data. Meteonook lets you export your data to JSON, which you can paste into notepad and save on your hard drive. Your seed info is saved to your browser cache, and if that gets cleared, you can lose all your data. I know this... because it happened to me. I was fortunate in two ways: first, I'd already found my seeds, and second, I had screenshotted both seeds and had the images on my phone. I foolishly never exported my data to JSON, and the only reason I avoided a crushing disaster was dumb luck (and a tiny spark of sensibility that made me screenshot my seeds). Do not make my mistake. Save your data, and save your seed when you get it.
8) Collect your data from 5 minutes past the hour
A lot of people will say you should record on the hour, but that's a bit outdated, as it refers to a version of the tool that didn't include the special clouds. The clouds, as explained on the site, can take up to 10 minutes to finish coalescing. I recommend traveling, then, to 9:05am instead of 9:00am. You’ll be better able to tell whether your special cloud just isn’t there, or if it was still forming.And that’s it! With those things in mind, finding your seed should hopefully be a more streamlined and less dangerous experience. Good luck! If you have any questions or corrections, I can be reached a number of ways.
If you can't find your seed:
There is a lot of good information on this on the main FAQ page of Meteonook. It can be very frustrating to be told you have incorrect data/no possible seed. And it is even worse to get a seed which only seems to match in certain situations!One thing that Meteonook does not mention, that I think may have come from more recent updates, is that holidays such as Halloween and Toy Day will have the default EventDay00 weather. I personally have experienced this, but I do not have any hard data.
Lag In Animal Crossing
What causes it and how to manage it
Firstly, what is lag?
There are two kinds. Frame lag, and network lag. You may have experienced network lag during online play, when instead of using your shovel, you twirled it around like a lunatic. Or perhaps you got stuck in a loading screen for a while when exiting a building. Network lag is caused by one or more people in a multiplayer situation having a weak connection, which causes everybody else's game to pause while theirs catches up. There are things you can do to make that better (such as move your router/Switch, eliminate interference, and mess with your DNS settings), but that is not the focus of this guide.This guide aims to focus on frame lag, which is when you are moving around on an island, and notice that things seem a little choppy, or that your character is moving slower than usual.Animal Crossing is designed to run at 30 frames per second, which many people will agree is the lowest minimum FPS you can have without it breaking immersion. Unfortunately, the Nintendo Switch hardware is not incredibly powerful, and Animal Crossing can be a taxing game, due to the fact that you can place as many items as you want on your Island.So now that we know what lag is, what causes it?
Causes of Lag
Simply put, lag happens when the system gets overloaded. This overload can be caused by various things, such as the system overheating, or having too many things to render on screen. There is a fair amount of mystery surrounding what exactly causes lag in Animal Crossing, but it's likely similar to lag in any other game. To disclaim - I am not a dataminer nor an expert, but I am a programmer, modder, and general gamer with over 2 decades of experience in both console and PC gaming, so I have a decent knowledge of how things work.I have read a lot of old wives tales about waterfalls, flowers, custom patterns, and more being lag-inducing. I've heard that you can reduce lag by putting up cliffs or making a huge lake. And these rumors all got started because there's grains of truth in them.So let’s set this straight: frame lag is caused by the graphics processor trying to render more than it can currently handle. Giving it more things to render (flowers, furniture, etc) will increase the load on the GPU. Giving it less things to render (by, say, making a huge lake that doesn't have any flowers or furniture on it, or building cliffs which obscure things from needing to be rendered), will reduce the load on the GPU. Lakes don't reduce lag any further than an empty field of the same size. It's all about poly count & complexity, and general system load vs capacity.
That means that the most lag-inducing items are the ones which have small, intricate models, especially ones which have animations. An example would be the Garden Wagon, which has a bunch of sculpted flower blossoms which move with the wind. In fact, most of the small plant items, such as the Terrarium, and the Succulent Plant, are offenders when it comes to lagging an area. So making, say, a garden shop area, and filling it with flowers & anthurium & garden wagons etc is likely to create slowdown when you're nearby it.
Another major factor is weather. For me this is actually the worst offender. Windy days, especially during autumn or cherry blossom season with the falling particle effects, cause all of the movable objects to animate, increasing load on the system. Times of day with heavy lighting effects, particularly sunsets with lots of volumetric light (such as during the winter), will also increase GPU load. It is possible for areas which are normally fine to lag during these times, so be aware of that when uploading a dream address etc.
The other two factors deal with your physical Switch system. If you have any background tasks running (such as downloads), those can take up system resources. This is only a minor consideration, as the Switch usually closes any background tasks once you open the game.Additionally, if you have been playing the game for a long time, even if the switch was turned off, your game can have significant stutters when you return to it. I believe this is caused by the memory not clearing when it needs to.The other physical issue which can potentially cause lag is overheating, which can sometimes occur to a greater degree due to clogged fans.
How To Reduce Lag
If your lag is caused by...
Furniture
Use less:
I’ve found that using more than 2 of a particularly high-poly item in an area can cause lag, assuming you have other items there as well. This is sad and ridiculous, but that seems to be how it goes. Removing the Terrarium and Garden Wagon from my florist shop cleared up 99% of the lag, and the area is fine, now. This unfortunately often means you need to compromise your vision for an area, so it ultimately boils down to how much stuttering you’re willing to tolerate.
Space it out: To space things properly, think about what the system needs to load for you to experience an area on your island properly. If you’re standing still, the game needs to show you all the items which are within a radius of where you’re standing, up to the edges of the screen. This means that areas at sea level, or which end in a cliff, will lag less than a grand vista on the third level, overlooking your marketplace. The game also needs to load your immediate surroundings off screen, so that when you move, you don’t experience the dreaded Pop-In (items not appearing right away, this is another symptom of system overload).
So how can you plan your latest redesign to avoid lag? You can space out your “attraction” areas (yards, shops, train stations, dig sites) about 1-2 “screens” apart. This can ensure that the game isn’t trying to load parts of your *spins wheel* ... boho marketplace, and your... *spins wheel* cottagecore pet shop at the same time. This can mean making “transition areas” like wooded paths, rivers/lakes, or fields. These areas should ideally have only minimal furniture. Vertically, you can space things out by building cliffs between them (I like to do at least 3 thick so I can build a bit of a wall on top desired, or plant trees). I have yet to do significant testing on this, but it seems that a cliff wall of any thickness between areas will help alleviate lag at least a little.
Weather/Light Effects
There’s little to be done here except to minimize lag using the other methods. Or beg that Nintendo release the leaked 4k Switch system, or better optimize ACNH.
System Overload
This is caused by background tasks, or improperly cleared/refreshed system memory. When this happens, it’s not a bad idea to save and exit your game, or even fully restart your Switch system.
Speaking of which, putting your Switch into sleep mode is not turning it off/restarting it. If you want to fully reboot the system (to clear up memory or resolve any other technological issues), you need to hold down the power button on the top until it brings you to the Power Options menu, at which point you can choose to Restart or Shut Down the system. My preference is to fully shut down, and then let the system sit for 10-30 seconds before turning it back on.
Overheating
This is often caused by clogged fans having difficulty withdrawing the heat from the system. You should periodically use compressed air to dislodge dust, hair, and general debris from all the vents on your Switch. Especially if you have pets or store your Switch near to the floor, things can get gunked up and potentially interfere with performance. Of all the above reasons, this is likely lowest on the list of things to target, but keeping your system clean is a good idea regardless.
A side note: Where you store your Switch can also affect whether it overheats easily. Obviously you should never store your systems near heat vents, but also keep it away from your TV or Monitor’s exhaust fans, from soft surfaces such as pillows or carpets, and if you can, allow for several inches of space on all sides so that it can disburse heat easily.
FAQ
Do waterfalls cause lag? Unlikely, because they are low-poly and the animation is in the texture (color), not the model (shape).
Do flowers cause lag? Yes, but not as much as you'd think. Despite having pretty intricate models with model-based animations, they seem well-optimized, and are likely only a secondary contributor to island lag.
Do custom patterns cause lag? This is a hard one to pin down, but my belief is that it does contribute in a significant way when combined with other lag causing items. I believe that stalls and simple panels in particular are more likely to cause lag than simply putting a custom pattern on the ground. And anecdotally, it seems that patterns with transparency might be slightly worse than a fully opaque pattern. However, I again stress that this is just a hunch and should be taken with a pinch of salt.
Do dropped items on the ground cause lag? Unlikely. They are fairly low poly, and I personally have not experienced any lag at all when my ground is covered with items.
Do lakes fix lag? Yes, but also no. But also yes. The lake itself has little to no effect in and of itself, but placing a lake means you cannot place items, and not placing items will “fix” lag in that area. The larger the lake, the fewer items your island needs to keep in its memory, and the better your island (particularly those areas) will run. So by all means, build that giant lake you saw on YouTube!
Do cliffs fix lag? This is a very similar answer to the one for the lakes. It’s not something magical about an unnaturally vertical pile of dirt, but the cliff obscures the view of the objects behind it, and also forces you to space things out - unless you cover the cliffs in items, which means it’s unlikely to help as much as if you only put flowers or bushes there.
What about things like Climbing Walls? Those hide the objects behind them, do they prevent lag? Honestly, I don’t know. Anecdotally, I have not seen them have the same effect as cliffs do. I have two theories. One is that the cliff extends the mesh of the ground itself, rather than being treated as an object on top of it. This would remove a little bit of the ground’s model and texture, whereas the climbing wall is rendered fully in addition to the ground. I’m really not sure that this is possible or how things work, but that’s my idea. The second theory is that the cliff is considered a full-tile solid object, behind which things cannot ever be seen. Compared to the climbing wall, which is only a half-tile object, meaning that things can potentially be seen past it (for example, when it’s turned sideways). This is a theory based on Minecraft modding, where a full tile object is treated differently than a partial-tile block - and the game might know that it doesn’t have to render things directly behind a cliff, whereas the climbing wall may not produce that same reaction from the rendering system. Phew, I know I got weird there for a second, but to wrap up: from a real world perspective, Climbing Walls etc should totally help in the same way that cliffs do. But I have not personally noticed that to be the case.
Anyway, thank you all for coming to my TED talk on lag in Animal Crossing. If you have any questions or corrections, I can be reached a number of ways.
Matching Design Colors in Animal Crossing: New Horizons
So you have a custom design that you’d like to match. Maybe it’s a design you deleted, or maybe it’s a path that would be perfect if it only had X or Y and you want to take a crack at adding that.I came up with this method, and have had good success with it. But please try to use it for acceptable purposes, and don’t copy art that disallows such things. And please remember to credit the original artist when sharing!With that said, on to the guide!
1 - Find the pattern image from the kiosk
The reason you specifically want the one from the kiosk is because:
It's larger than viewed in your patterns screen
You can view both the in-game preview with smoothing, as well as the pixel layout
There is a minimum of other colors present, which will reduce artifacting and result in an easier time discerning the colors
There will be no in-game lighting effects to throw off the way the colors appear.
2 - Take a screenshot
Make sure you take a screenshot using the screenshot button on your Nintendo switch. Do not take a photo of your screen with your phone, as that will significantly change the color values that you'll get. Here's a guide on taking and finding screenshots.
3 - Get the screenshot off your switch
You'll want to send that photo to your smartphone rather than uploading it, because that will result in the least amount of data loss and artifacting. From there, you can use it on your phone, or transfer it to your tablet or pc if you prefer. Here's a guide on sending a screenshot to your smartphone. If you intend to transfer your file to a different device, I recommend doing so via something like iCloud or Google drive, as they are less likely to compress the file, and the colors will stay more accurate.
4 - Get the hex values of the colors
Once you have the screenshot accessible, you can use your image editing or color picking program of choice to get the hex values. You will use the eyedropper tool to select the color you want, and the program should tell you a 6 digit alphanumeric code, often preceded by a #. Note them down because you'll need them later. Here are some tips:
When taking a sample, try to take it from the center of the colored area. The edges are where there will be the most color variation due to artifacting.
Take one sample from the pixel layout, and one sample from the in-game preview. They are likely to differ slightly, so you will want to make a note of each hex value so that you can reconcile any variation.
If possible, make larger swatches of each color sample on your palette, as shown in this screenshot. It is also helpful to label each swatch with its hex value, but I didn't do that. I just labeled mine and noted them in a separate document.
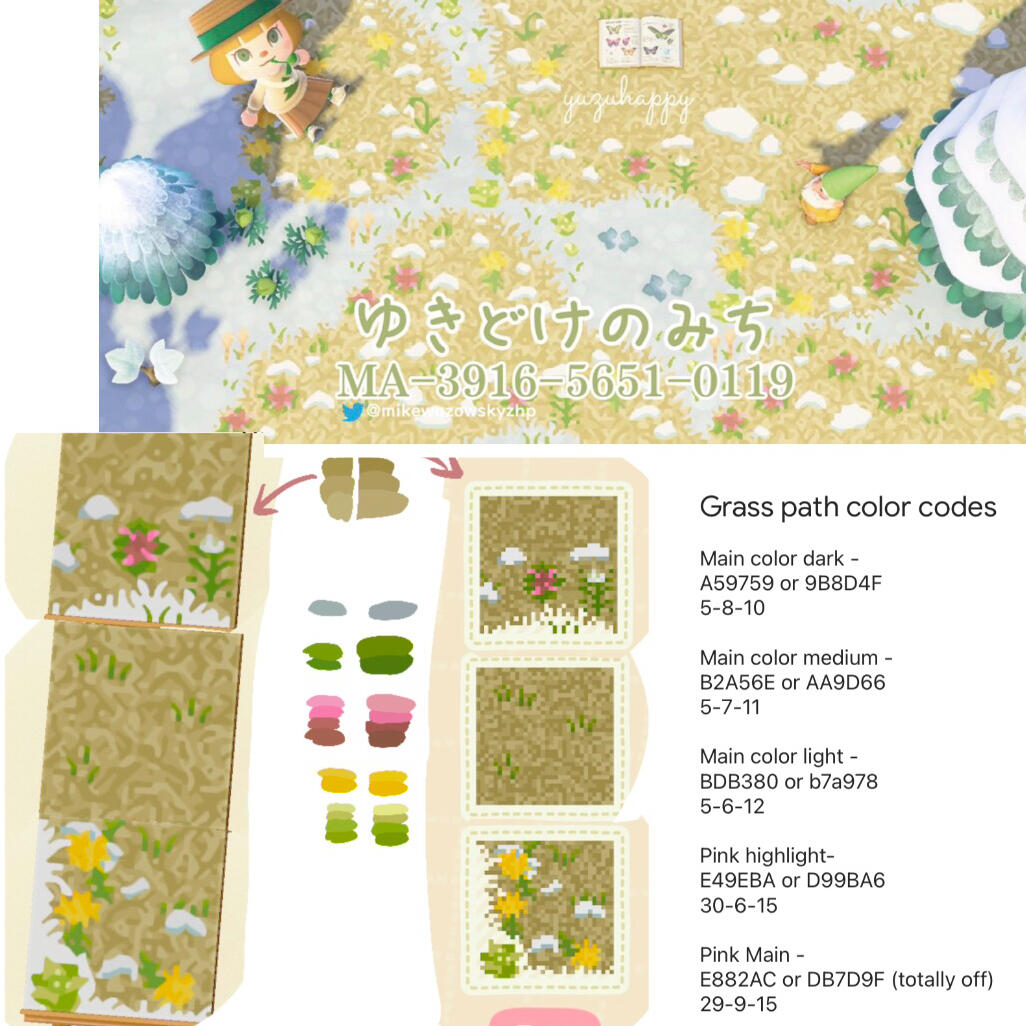
5 - Convert the hex values into ACNH colors.
You have two options here, you can either search for the hex code using ACNHcolorpicker.com, or you can find it manually using this spreadsheet.
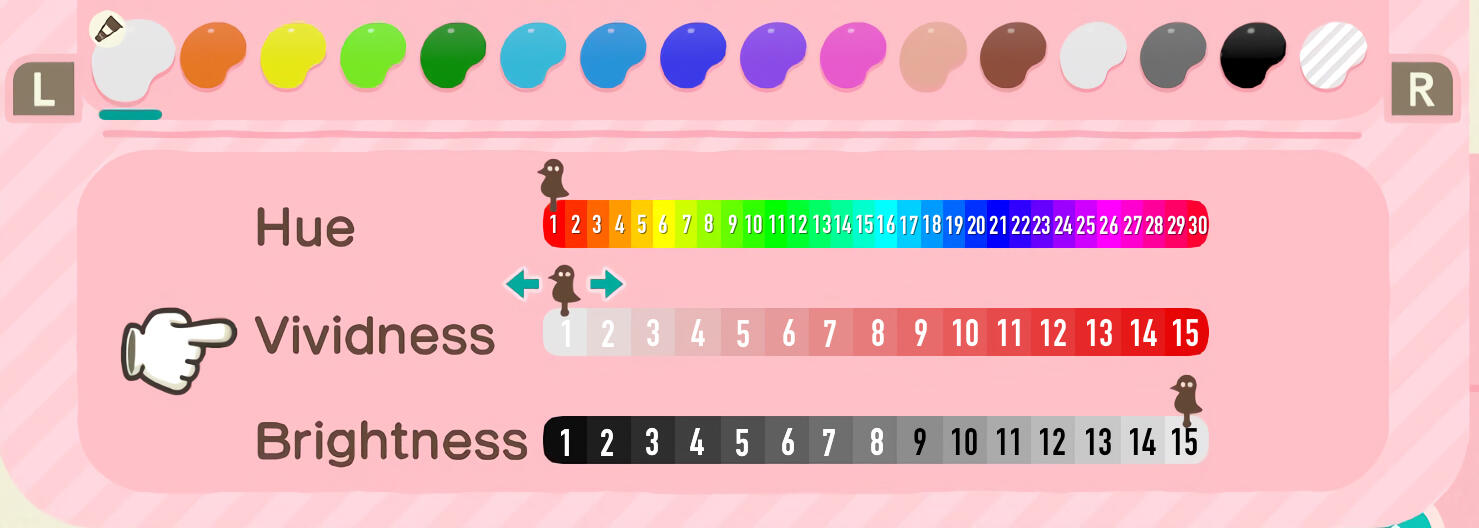
The way I note the values is hue-vibrance-brightness (eg 5-9-15). I've also seen h5 v9 b15 and other variations, but I think the 3 numbers in order method is easiest to parse.
Note that the conversion done by acnhcolorpicker doesn’t handle reds and browns as accurately as other hues, and will likely require tweaking.
6 - Copy those values into the game
Here's a graphic that explains how the numbers work when choosing the color values in game. Essentially, you count from the left side of the slider, with the first value of each line being 1. Once you have them all entered, save your pattern.
7- Compare to the original
Here's where you'll have to rely on your own talent. Place down the pattern you're copying in an area where it's easy to see, and put down your pattern next to it. then edit your pattern to place your colors as close to the original, so that you can compare them in game.The comparison is much easier if you use the in-game camera function to zoom in and change the angle.I prefer to do this outside, during midday when it's partly overcast. However, if it's evening, raining, too sunny, etc - you can place patterns inside as well, to ensure you get consistent lighting.
8 - Tweak until satisfied
If you took color samples from both of the preview and the pixel layout, they can usually give you an idea of which values could use changing. For example, if the preview gave you 5-8-15, and the pixel gave you 5-9-15, then you know vibrance could potentially use tweaking!
And you’re done! If you have any questions or corrections, I can be reached a number of ways.
Alt Character Guide/FAQ
So, you’re thinking about making a secondary character in Animal Crossing: New Horizons? Maybe you want a second house to fashion into a cafe or a torture dungeon. Maybe the idea of another 2400 storage slots is intoxicating. Maybe you just want to make the perfect partner you know you could never have in real life - hey, this is a judgment-free zone! You do you.In any case, you may want certain things clarified before you commit to the effort of making a new character. I should mention that I was initially inspired by this reddit post, which you may also want to reference (note that they have some inaccurate information on how controllers work for party play). I will cover some of the same things in the interest of completeness.
A few potential downsides that you may wish to know about:» Your villagers will talk constantly about your second character, whether or not they have ever met. It’s a similar amount to how often they reference your visitors.» In order to make a second character, you make a second profile on your Switch, which will by default prompt you to choose which profile launches the game every time. I think this can be turned off in settings, though.» They will always get their own tent/house, whether you like it or not. Not really a downside unless you’re crammed geographically, but worth mentioning.» A less mechanical and more personal note - adding a secondary character can bring with it a pressure to complete your daily tasks on both, a need to check their mailbox to make it stop pinging, etc. Be aware of this potential stressor if you suffer from compulsions like perfectionism or anxious mental illnesses.
How to make a second Animal Crossing islander
The process is pretty simple. You’ll need a second Switch profile (this may or may not require a Nintendo Account and thus its own email - I did create a Nintendo account with my second email anyway so I’m not sure if it can be done without). The second Switch profile needs to open the game, and it will automatically assign them to your existing island. Ta-da! Second character.
Getting them up to speed
Your second character will automatically get the benefit of most of the things you’ve already unlocked, such as terraforming (although they’ll need to purchase the “licenses” with their own miles) and upgraded shops etc. They will still need to unlock their own bag space, radial menu, hairstyles, and so on, as well as pay for their own house upgrades. However, I’m assuming that by the time you’re thinking about making a second character, you’ll have bells a’plenty to throw at them.
An initial note about online: The secondary character will not be able to send or receive mail from off-island visitors unless you purchase a Nintendo Online subscription for them. Additionally, they cannot use other online features such as the Able Sisters Kiosk, or visit other people’s islands/open your island’s gates.A note about switching characters: If you have a regular Switch, you do not have to exit the game to swap from one character to the other. You can use the Call Islander app to summon the other characters on your island for co-op party play, select Change Leader, and if necessary, choose “end session” on the new leader. However, there’s a lot you can get done just by dragging the other character around (although the camera is, admittedly, obnoxious).In order to play couch co-op with yourself, you must either use one pair of Joy-cons each as their own controller (which I do NOT recommend, holy crap), or you’ll need another controller or pair of Joy-cons. This is required to control both on-screen characters. If you have a Switch Lite or do not have a second controller/1-2 pair of Joy-cons, you cannot play co-op with yourself and must switch user by saving, exiting, and opening the game as the second profile.A guide on couch co-op party-play
Gathering
Money Tree: YES. The glowing spot will only show up for each character in singleplayer mode, not while both players are on.Beach DIY Bottle: YES. Only one bottle at a time can spawn, but once it’s picked up, the second one can appear the next time the island is loaded with the other character on it.Rocks: YES, BUT. The money rock is obtainable by both characters (although which rock it is may differ). Rocks can be gathered during co-op with your alt. For the rocks, each rock is only able to be harvested for materials (stone/iron/gold/clay) once by either player (main or secondary) per day. If the first player gets a money rock, they are unable to get materials out of that rock, and so the second player can then harvest the normal materials from that same rock.Harvesting Trees: NO. Fruit and wood gained from chopping trees is once per tree. Sticks, as well as other shaken materials such as Ornaments or Acorns, are infinite however.
Trading/Gathering
Catalogs: NO. The second player has an entirely separate catalog of all items, making it necessary for them to hold each item type in order to be able to mail-order it.Nook Special Goods: YES. Well, sort of. Second characters can access and order from the special daily goods, but the item selection is island-wide and not specific to character.Critterpedia: NO. The second character has their own Critterpedia. This is related to the next point:Bug and Fish Trading: YES. Any items placed by one character (outside of their house) can be picked up by the other. So by this method, you can trade bugs and/or fish (helpful if you want to give them specific critters to have sculptures made from)! Note that despite holding a creature, you will still get the “Yes!” the first time you catch it on your own.Storage: YES. A major benefit of having a second character is that they have their own house storage, completely separate from - and inaccessible by - the other characters on the island. As a side note, any items placed in a character’s house cannot be taken or moved by other characters.Registered Music: NO. Second characters cannot access songs you have registered, they can only choose to stop your music and register/play their own.Mail-Orders: YES, BUT. The second player may order up to 5 items from the Nook Catalog without it counting against the other’s total - however, mails from one character to the other do count against the sender’s 5 items.
Patterns
Slots: NO. Pattern slots, both basic and pro, are per island, not per character. Yes, it sucks. :(Editing: No. A second character can erase or overwrite your patterns, but not make changes to them.
Visitors
Flick and CJ: YES. Second characters can order their own collectibles.Redd: YES. Second characters can order their own piece of art.Label: YES. Your second character will get a random/different prompt and clothing item to dress for, as well as their own tickets and clothing reward. However, the one time I have tried this, the Labelle clothing item reward was the same for both characters - I imagine this is intentional since it will appear in the shop the next day.Saharah: YES. Second characters get the same initial 3k wall/floor and rugs as the initial character, but the ticket-purchased wall and floor will be random.Gulliver/Gullivarr: YES. Whichever character helps him second will get a spiel about how he was helped by the first character (assuming they finished helping him), but fell asleep and got his phone wet again. They will then get the chance to help him, getting a second reward. This must be done in singleplayer.Wisp: YES. Similar to Gulliver, the second player will simply re-scare them and have to collect the spirit pieces on their own, and will receive their own reward for it.Celeste: YES. Second characters, along with any other visitors, will receive a random non-owned recipe (unless it is the first day of the new zodiac period, when all players receive that zodiac’s recipe).KK: YES. Second characters can request and obtain their own music. Note that their first song will be New Horizons, you cannot choose until the second time.Pascal: YES. Both characters can give him a scallop and get a reward.
Misc
Infrastructure: NO. Only the Resident Representative can initiate infrastructure changes.Home: YES. Your secondary character’s home can only be moved/expanded/customized by that character, and cannot be affected in any way by your main character.Wishes: YES. Each character on an island can get a maximum of 20 star fragments apiece.Museum Donations: YES. Either character can donate as long as the item hasn’t been donated before.
And you’re done! If you have any questions or corrections, I can be reached a number of ways.
Animal Crossing: New Horizons
This list is random trivia that I’ve encountered in my many, many hours of play. They are all accurate, to my knowledge, but I’m writing all of this from memory so phrasing of menus and stuff may be slightly off.
Redd’s ship will appear as an icon on your minimap. So rather than having to run all the way back to your secret beach, you can simply check your map to see if the ginkgo leaf icon is there.
You can toggle the visibility of your minimap by pressing the X button while viewing your Map application. The options are “Always On,” “Always Off,” and “Off While Moving” - which is the default.
You can speed up dialogue by pressing the B button, or holding down L1. Spamming the B button may feel faster because it’s more active, but holding down L1 can be used in conjunction with A or B to progress to the next dialogue bubble - this means you can speed up the text without accidentally agreeing to or canceling anything!
You can speed up your crafting animation by double-tapping A once it begins. You don’t need to press it more than twice.
Want to see who’s on your island? If you are hosting a multiplayer session, you can get a list of people currently visiting by pressing the “-” key and choosing “View Another’s Passport.” The passports of all visitors will be available for you to page through. If there is no one currently there, the prompt will read “Do you want to wrap things up?” instead of “What would you like to do?”
In addition to sitting on them, you can place items on Zen Cushions, and Piles of Zen Cushions.
You can view the name of a pattern’s artist by initiating the “delete” dialogue. Select the custom pattern, then choose “Delete” and it will prompt you: “Do you want to delete [pattern] by [artist]?” You can then choose “Actually, no” (the default response) to return to the pattern menu. This only works if it’s a design your character downloaded. If another islander downloaded it, it will instead show “Downloaded by (character).”
If you know the exact name of a pattern (for example “mushroom path left”), you can search for it on the kiosk, and only patterns with that exact name (capitalization doesn’t matter) will be returned.However, if you want to search for Japanese-named patterns, you’ll need to change the language of your Switch system, as there is no kanji keyboard in the US version of the game.
Taking videos: The record button on your Switch can be pressed and held down to record the previous 30 seconds of gameplay. This will be familiar to console gamers, but others may not be aware that it records backwards rather than forwards.
There are several ways of sharing screenshots and videos from your Switch. Via Facebook, Twitter, Send to Smartphone, or by transferring with an SD card. The last option is the best if you have a lot of files to transfer, or you want to make sure they don’t decrease in quality due to compression, but it requires an extra purchase or two. For Facebook and Twitter, I have two tips:Facebook: If you want to post things without spamming your friends and family, you can set your posts to be visible to you only by going to: Settings > Apps and Websites > Nintendo Switch Share (View and Edit) > Who can see you use this app? > Only Me. This assumes you already have your Switch connected to your fb account - if you don’t, there are guides online you can use.Twitter: You can make a twitter account just for use with your Switch/Animal Crossing. This is my preferred method, because I can simply post the images and save them or link them to others - you control the audience without having to mess with privacy or visibility settings.
When shaking a tree, make sure you are holding a net. Position yourself directly to the south of the tree and shake. If a wasp nest falls out, your character will automatically turn to face it. So as soon as you see it fall, start spamming the A button, and your character will swing the net and catch the wasps before you can get stung. Just be sure there is nothing blocking the swing of your net (bushes, fences etc)! Sometimes you can get blocked, if the game processes you hitting the object before it processes you catching the wasp.
Tarantulas and Scorpions - these will usually flee if you are running and do not have your net out. If you have your net out, or pass them too casually, they will try to attack you. To catch one, watch its stance. You can hold down A with your net equipped to sneak up on a bug (release to swing!). When the bug is shaking and threatening you, stand still. Once it calms down, creep up. It’s like red-light, green-light. When you are close enough, you can swing and (if you’ve played your cards right) catch it instead of getting stunned!
Picking Your First 3 Villagers
So, you want to make sure your first 3 pickable villagers are the ones you want, huh? It's a little difficult to figure out how to do a villager hunt for all three, which is why I am writing up this guide. Read on to find out how to choose/hunt for your first three choosable villagers!
A quick rundown of how initial villagers are obtained:
- Your island comes with 2 villagers: one sisterly, one jock.
- Then, you'll add plots to invite 3 more villagers - these are the ones this guide focuses on. These will be peppy, normal, and lazy.
- Your 4th villager will be a smug via your campsite. You cannot choose or alter this, even if you exit without saving before speaking to them.
- Your last 6 villagers can be any personality, and can either be autofilled from the void, or hunted (once per day) via Mystery Island tours.
Edit: As I have learned since writing this guide, you can begin inviting villagers from mystery islands as soon as you have access to the airport. You can invite one per day, and they will begin moving in once you place and furnish all three plots, as described in this guide. This guide covers the "point of no return" for choosing villagers for your first 3 plots.Note that amiibo villagers will not be available until after these first three plots are filled!
When it's time, Tom Nook will give you three plots to place, and he will say that they need to be fully furnished.After you place the plots, the game will prompt you to make and place furniture. Do not complete this task. Once all the furniture is placed and you speak to Tom Nook to finalize, you can no longer choose these villagers.However, even if you turn in all interior furniture and place all exterior furniture, you aren't screwed just yet. Even if you got the notice from each house saying that everything was turned in and the plot is ready, you still have time to fix things.As long as you don't talk to Tom Nook or travel to the next day*, you can go back and remove one piece of external furniture to prevent finalizing. I just picked them up and dropped them as items - you can check the progress sign on the plot to ensure that one item per plot is missing the green checkmark.* I do not know for sure about traveling to the next day, as I did this all on one day. However, I'd recommend being safe about it.Each of the three plots should have one item missing for the next 2-3 days. You can only invite one villager per day from a Mystery Island tour. So once you invite someone on day one, you'll have to wait until the next day to go on another hunt.Once you have done your three hunts and invited a peppy, a normal, and a lazy villager, you can complete the plots all at once. Go talk to Tom Nook to let him know the plots are ready, and one of your invited villagers will move in each day for the following three days!Congrats, you're all set! Hopefully this guide was helpful. If you have any questions or corrections, I can be reached a number of ways.
Island Restart
"Speedrun" Guide
If you want to restart your island for decorating purposes, you probably want to do it as quickly as possible. But there's a lot to the early game, and it's tough to remember which things unlock what, or when it's too late to do X, Y, or Z. This guide aims to help with that.This guide takes some information from the First Days in ACNH guide, which is a fantastic resource and is great to use alongside this one.
Deleting Your Old Island
Deleting your island data to start anew doesn't completely erase the existence of the island from the servers. Your Dream Address, as well as all your Custom Designs, will remain. They can never be changed, since their save data is gone, but they will be archived for the life of the servers.To delete your island data, go to System Settings, then to Data Management and scroll all the way down to Delete Save Data. Then, make sure you're ready to say goodbye, and hit the button.
Remember to use the - button to reenable cloud backups for your new island!
0: The Getaway Package
- The nooklings talk a lot. You don't have to spam B to accelerate their dialogue: you can hold R1 instead.
- You cannot change your name later, but you can change your appearance. If you're planning on restarting to get the layout you want, speedrun the gender and appearance settings by accepting the first options.
- Set your birthday to a day or two in the future! This will give you a 2k Nook Mile boost early on, as you earn 2,000 NM for celebrating your birthday.
- If you want to pick a Southern Hemisphere island, it's faster to say you live in the Northern, and then ask to be given a Southern Hemisphere island when prompted.
- You can't change your river estuaries, beaches, rocks, or the location of your secret beach, airport, or resident services - so make sure you're picking a map that you'll like! If the first 4 don't suit you, close the game and start again!
- A small note: remember that dreams begin at the Resident Services plaza rather than the airport, in case that influences your design choices.
1: Pre-Online Play (Day 1)
- If you want to keep Blathers in his tent, instead of upgrading to the museum, be aware that you can not move the tent once it's placed. It must be upgraded to the museum building before it can be moved. Unfortunately, this does mean that it can only be placed on the initial landmass you begin the game on, as you cannot gain access to the vaulting pole until after you place Blathers' tent plot. See the “How To” section for more info.
- You'll want to complete your first 5,000 Nook Miles objectives as quickly as possible. You can get a boost of 2,000 NM from your birthday, but beyond that: Here is a list of the easiest early-game Nook Mile earners (Information from game8.com and the IGN wiki):
| Objective | Task | Miles |
|---|---|---|
| (Your Island) Miles! | Create an island | 500 |
| Angling for Perfection | Catch 10 fish | 300 |
| Island Togetherness | Greet All Villagers | 300 |
| You've Got The Bug | Catch 10 Bugs | 300 |
| Taking the Sting Out | Get stung by wasps twice without taking medicine | 300 |
| Trashed Tools | Break any tool from using it | 300 |
| Greedy Weeder | Sell 50, then 200 weeds | 300, then 500 |
| Island Shutterbug | Take a photo | 300 |
| Edit Credit | Change your profile with the passport app | 300 |
| Nookphone Life | Use several NookPhone apps, for a total of about 10 times | 300 |
| First-Time Buyer | Buy an item from Timmy | 300 |
| Seller of Unwanted Stuff | Sell an item to Timmy | 300 |
| Bulletin-Board Benefit | Write a message on the bulletin board | 300 |
| First Custom Design! | Use the Custom Designs app to make a design | 500 |
| Total | - | 5,100 |
For more easy Nook Mile objectives, please see this section.
2: Online Friends & Villager Hunting
- With the airport now open, you can get access to the Best Friends app (which you'll want, if you'd like access to sending/receiving mail). You can unlock this by telling Orville you'd like to visit someone/have visitors online. You do not need to actually go anywhere, he'll give you the app and then you can exit out of the menu. This does NOT unlock with local play, even if you do actually visit someone.
- Switch friends will remain even once the island data is deleted, so you can visit friends in Animal Crossing without extra steps. However, you will need to re-add as Best Friends if you want to do that. Additionally, all your resident representatives will remain in your friends' apps forever, even if you unfriend at the Switch level.
- You can begin villager hunting using NMTs immediately. You can only invite ONE villager per day to live on your island, however. They will begin to move into your beginner three plots once you have those fully furnished. I recommend finding all three villagers for these plots BEFORE you finalize the furnishings with Tom Nook. Please see this guide on your first 3 plots for more information.
- While you're villager hunting, chop trees and hit rocks to obtain materials for your shop upgrade (unless you've got a sugar parent).
- If you want to set your game during a specific weather pattern, you can begin collecting data for a Meteonook seed on day 2.
3: Nook's Cranny and Able Sisters
- After you help Timmy upgrade the shop to a building, Mable will start coming to visit. Buying clothes from her at each visit will ensure she offers to set up shop as quickly as possible. This should only take 2-3 visits. Scroll down to the “How To” section for more info!
- Make sure to start speaking to Sable ASAP after the Able Sisters opens if you want to unlock her patterns for furniture customization. It takes 11 consecutive days to win her friendship. If you miss a day, it seems to pose a slight (but not critical) delay.
- Once Sable begins offering you patterns, you'll need to speak to her for 10 days to unlock them all.
Unlocking Things
Inventory:
The first Pocket Organization Guide is available for purchase at the Nook Miles Redemption, directly after you upgrade from a tent to a home. The second is available after Resident Services upgrades to a building (shortly after finishing the 3 plots quest).Terraforming:
This is unlocked after KK Slider plays on your island for the first time. To do this, you need to get to 3 stars, which can be a frustrating process. Here are some tips:
- You can use this tool at Nookplaza.net to determine your approximate rating.
- You need a minimum of 8 villagers moved in. With 7 or fewer villagers, you will be capped at 2 stars.
- Bridges and Inclines will count heavily towards your score (but it's possible to do without them).
- Buildings such as the upgraded museum etc will also count. However, again, they're not necessary.
- It's important to decorate across the majority of the island. Try to place a few items in each quadrant of the map. It does not need to look good.
- Larger items (3x3+) are worth more points.
- Small items placed on the ground instead of on a table or other surface will have a slight negative effect.
- Fences and other DIY items count for more points.
- Having many trees (but less than 220) and flowers (any kind) will earn points.
- Items on the ground will not count significantly against you at the 2-3 star level (although Isabelle will mention them).
- I believe I last did this with under 100 total items scattered randomly, so don't be afraid to place a few things and then run back to Isabelle to check on your ratings! They update immediately.Other Things:
- For more information on in-game unlocks, please check out ChibiSnorlax's guide here!
HOW TO:
Keep Un-upgraded Nook’s Cranny
Nook’ Cranny will upgrade after you buy and sell 200,000 bells worth of merchandise, and after 30 days have elapsed. You also need to have spoken to Mable at least once.To avoid triggering the upgrade, you can:
- Avoid using the shop at all (or keep very good track of bells spent and earned).
- Play for <30 days after unlocking the first Nook’s Cranny. It’s unclear whether this is calendar days or total logins.
- Do not speak to Mable when she visits. Keep in mind this option will prevent Able Sisters from opening, which means you won’t have access to the custom design kiosk.
Keep Blathers in Tent
Once you place Blathers’ tent, you can speak to him as much as you’d like without opening the museum. He can still give you the vaulting pole and shovel, and you can assess unlimited fossils.To avoid upgrading to the museum:
- Donate less than 15 total items to the exhibits. This includes fish, sea creatures, fossils, and bugs.
Not Unlock Able Sisters
Able Sisters will upgrade after you purchase items from Mable on 3 separate occasions (per the official guide) - or perhaps 2 occasions (per the unofficial FAQ).To avoid unlocking the Able Sisters:
- Speak to Mable 1 time or less.Keep in mind that not having Able Sisters will lock you out from the Custom Designs Kiosk and also prevent you from obtaining Sable’s patterns for furniture customization.
Other Easy Nook Miles Objectives
| Objective | Task | Miles |
|---|---|---|
| Paydirt! | Dig up a glowing spot | 300 |
| Bell Ringer | Spend 5,000 bells | 300 |
| Shady Shakedown | Shake an item out of a tree | 300 |
| Lost Treasure | Shoot a gift over water | 500 |
| Shop to it! | Buy an item from the Nook Stop Terminal in Resident Services | 300 |
| Miles for Stalkholders | Buy some turnips | ?? |
| Netting Better! | Catch 5 wasps in a row | 1,000 |
| Pit-y Party | Craft and bury a Pitfall Seed (requires DIY) | 300 |
| Overcoming Pitfalls | Fall into a Pitfall Seed trap | 300 |
| Town Icons | Redesign the town flag and town tune | 500 and 500 |
| Happy Birthday! | Celebrate your birthday in animal crossing | 2,000 |
| Making a Change | Use a wardrobe item to change your outfit | 500 |
